Contour Reference Architecture
This document details a reference architecture for running Contour as the ingress controller for a Kubernetes cluster, such as Tanzu Kubernetes Grid (TKG). It covers deployment considerations, multi-tenancy concerns, and best practices. This document represents how the VMware field team approaches Contour deployments in large enterprise Kubernetes environments.
Throughout the document, “Contour” refers to the ingress controller as a whole. In contrast, “contour” refers to the control plane of the ingress controller, or the component of the ingress controller that interacts with the Kubernetes API.
Each section covers architectural recommendations and, at times, configuration for each concern in a Contour deployment. At a high-level, the key recommendations are:
- Follow the split deployment architecture to deploy
Contour onto the cluster.
- Use a Deployment to run at least two instances of contour
- Use a DaemonSet to deploy Envoy. (Use a Deployment if you want to auto-scale Envoy pods.)
- Use an external load balancer to distribute traffic across Envoy pods.
- Set
externalTrafficPolicy: Localwhen exposing Envoy over aNodePortorLoadBalancerservice - Consider using dedicated ingress nodes to minimize variability in request latency and unexpected performance issues.
- Consider binding Envoy to the underlying host’s network.
- Create a wildcard DNS record that resolves to the load balancer in front of Envoy.
- Leverage TLS certificate delegation to secure wildcard TLS certificates.
- Avoid ingress configuration clashes by leveraging HTTPProxy inclusion or an admission controller, such as OPA Gatekeeper.
Contour overview
Contour is an ingress controller for Kubernetes that leverages Envoy in the data plane. With Contour, you can route external clients to network services (usually HTTP and HTTPS) running within your Kubernetes cluster. Contour routes traffic according to rules defined in Kubernetes Ingress resources and Contour-specific HTTPProxy custom resources. The HTTPProxy custom resource enables advanced use-cases that are otherwise not available through the Kubernetes Ingress resource, such as configuring the load balancing strategies, header-based routing, TLS cert delegation, and more.
Like other ingress controllers and Software-Defined Networking (SDN) solutions, Contour is composed of a control plane and a data plane. The control plane is a Kubernetes controller (“contour”) that watches various resources defined in the Kubernetes API, such as the Ingress and HTTPProxy resources. The data plane is a collection of Envoy proxies that use contour as their management server. The following diagram shows a high-level overview of a typical Contour’s deployment.

When Envoy starts up, it connects to contour and opens a persistent gRPC stream. Using this stream, contour configures Envoy according to the Ingress and HTTPProxy resources defined in the Kubernetes API. As these resources change, contour sends updates to Envoy to reflect the latest configuration. This API-driven configuration capability makes Envoy (and thus the Contour ingress controller) an excellent fit for an environment as dynamic as Kubernetes. The configuration is streamed as soon as it changes, and no restarts are required for Envoy to start using the new configuration.
Shutdown manager
The shutdown manager is an ancillary component that enables the graceful shutdown of Envoy. Its goal is to reduce the number of dropped connections or requests during pod lifecycle events, such as an update.
The shutdown manager is a sidecar that runs alongside the Envoy container. It
exposes an HTTP endpoint that accepts GET requests on /shutdown. This endpoint
is wired up as the preStop hook in the Envoy container.
When the Kubelet needs to terminate an Envoy pod, it sends a GET request to the shutdown manager, according to the preStop hook configuration. The shutdown manager, in turn, tells Envoy to drain existing connections. It also tells Envoy to fail its readiness check, which prevents upstream load balancers from establishing new connections. The shutdown manager then blocks and keeps the pod running until Envoy drains all the connections, or until the shutdown grace period is reached. To determine whether all connections have been drained, the shutdown manager polls Envoy’s metrics endpoint and looks at the active connections metrics.
Ingress Patterns
Contour supports different patterns to expose applications to requests from outside of the cluster.
HTTP proxying
Exposing applications over HTTP is the most basic pattern. Clients send an HTTP request that is routed to Envoy. Once there, Envoy inspects the HTTP request and routes it to a backend pod according to the Ingress or HTTPProxy configuration.
Given the following HTTPProxy resource, Envoy will route requests to the app1
Service when the request has a Host header of app1.example.com.
apiVersion: projectcontour.io/v1
kind: HTTPProxy
metadata:
  name: app1
spec:
  virtualhost:
    fqdn: app1.example.com
  routes:
    - conditions:
        - prefix: /
      services:
        - name: app1
          port: 80
The following diagrams shows the flow of the request:

Exposing applications with TLS (HTTPS)
Contour supports exposing applications over HTTPS. To make routing decisions according to the request, Envoy needs to decrypt the incoming TLS connection. That is, Envoy terminates the TLS connection and then routes the request to the backend server over an unencrypted connection.
Building on the previous example, the following configuration tells Envoy to
expose app1 over HTTPS using the certificate and private key contained in the
tls-cert Secret.
apiVersion: projectcontour.io/v1
kind: HTTPProxy
metadata:
  name: app1
spec:
  virtualhost:
    fqdn: app1.example.com
    tls:
      secretName: tls-cert
  routes:
    - conditions:
        - prefix: /
      services:
        - name: app1
          port: 80
The following diagram shows the request flow:

When TLS is enabled, Envoy redirects HTTP clients to the HTTPS endpoint. The
redirect is enabled by default when using TLS, but it can be deactivated on
specific routes by setting permitInsecure: true. The following diagram shows
the redirect to the secure endpoint:

TLS connection to an HTTP backend
As mentioned above, Envoy establishes an unencrypted connection to the backend
service when TLS is enabled. Envoy can, however, create a secure connection when
necessary. If the backend exposes a secure endpoint and expects a TLS
connection, you can set the protocol field to tls in the route configuration.
The following sample HTTPProxy resource sets the protocol field of the app1
service to tls:
apiVersion: projectcontour.io/v1
kind: HTTPProxy
metadata:
  name: app1
spec:
  virtualhost:
    fqdn: app1.example.com
    tls:
      secretName: tls-cert
  routes:
    - conditions:
        - prefix: /
      services:
        - name: app1
          port: 443
          protocol: tls
The following diagram shows the connections given the above configuration:

By default, Envoy does not validate the certificate served by the backend.
To enable validation, you must specify a caSecret and subjectName in the
HTTPProxy configuration:
apiVersion: projectcontour.io/v1
kind: HTTPProxy
metadata:
  name: app1
spec:
  virtualhost:
    fqdn: app1.example.com
    tls:
      secretName: tls-cert
  routes:
    - conditions:
        - prefix: /
      services:
        - name: app1
          port: 443
          protocol: tls
          validation:
            caSecret: ca-cert
            subjectName: app1.example.com
Exposing TCP services
In addition to HTTP services, Contour can also expose TCP services through Envoy. The only requirement is that the incoming TCP connection is encrypted with TLS and that the client indicates the destination hostname using Server Name Indication (SNI). Envoy needs this indication to route the connection to the appropriate backend.
TCP proxying is configured using the tcpproxy field of the HTTPProxy custom
resource, as in the following example:
apiVersion: projectcontour.io/v1
kind: HTTPProxy
metadata:
  name: tcp-svc
spec:
  virtualhost:
    fqdn: tcp-app.example.com
    tls:
      secretName: tls-secret
  tcpproxy:
    services:
      - name: tcp-app
        port: 8080
With the above configuration, Envoy first inspects the SNI extension to determine the destination server. Once identified, it terminates the TLS connection and forwards the TCP traffic over an unencrypted connection.

TLS passthrough
If the backend TCP service needs to handle the TLS connection, you can enable TLS passthrough. In this mode, Envoy inspects the SNI extension to determine the backend service but does not terminate the TLS connection. Instead, it forwards the TLS connection to the backend service.
To enable TLS passthrough, set tls.passthrough = true, as in the following
HTTPProxy example:
apiVersion: projectcontour.io/v1
kind: HTTPProxy
metadata:
  name: tcp-svc
spec:
  virtualhost:
    fqdn: tcp-app.example.com
    tls:
      passthrough: true
  tcpproxy:
    services:
      - name: tcp-app
        port: 8080

Deployment architecture
You can deploy Contour onto a Kubernetes cluster in different ways. Because Envoy and contour talk to each other over a gRPC connection, you can deploy them as separate pods. Alternatively, you can deploy Envoy with contour as a sidecar. These deployment models are discussed below.
Split deployment
In this model, you deploy contour and Envoy separately, contour as a Deployment and Envoy as a DaemonSet. (Envoy can also be managed by a Deployment. More on this below.) The contour deployment runs two or more replicas to ensure high-availability of the control plane. The contour replicas are accessible through a ClusterIP Service. Envoy uses this Service to connect to contour and initiate the gRPC stream to get the routing configuration. The following diagram shows the control plane architecture of the split deployment.
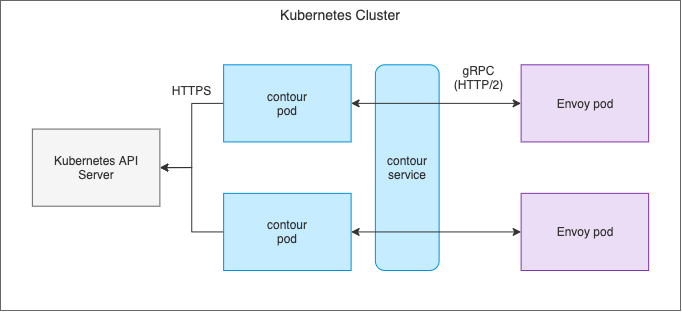
The main benefits of the split deployment model are scalability and efficiency. Because contour and Envoy are deployed separately, you can scale the data plane independently of the control plane. That is, you can horizontally scale the Envoy pods to meet the traffic demands of your applications without increasing the number of contour pods. By running the minimal amount of contour pods necessary, you save on compute resources while also reducing the load on the Kubernetes API server itself.
As mentioned above, the split deployment model can be more scalable and efficient than the same-pod deployment model. There is a tradeoff involved, however, in that the split deployment model is more complex. Given that contour and Envoy run as separate pods, (and thus live in different network namespaces), they need to communicate over the pod network.
The interaction between contour and Envoy exposes an attack surface that you must mitigate, given that contour serves sensitive information such as TLS secrets. These secrets must only be available to trusted Envoy clients and no other workloads in the cluster. In other words, contour needs to authenticate clients, and it does so using mutual TLS. In the split deployment model, contour uses a serving certificate to expose an HTTPS endpoint, and Envoy uses a client certificate to authenticate with contour. Having to manage these certificates over time increases the complexity of the split deployment architecture.
Sidecar deployment
The sidecar deployment architecture co-locates contour and Envoy in the same pod (the “Contour pod”). This architecture is similar to other ingress controllers, such as the NGINX ingress controller. Multiple replicas of the Contour pod run in the cluster and are managed by a Kubernetes Deployment or DaemonSet.
Because Envoy and contour are in the same pod, they can talk to each other over localhost. This removes the need for mutual TLS between Envoy and contour, which alleviates the operational burden of managing certificates. The following diagram shows the sidecar deployment, focusing on the interaction between contour and Envoy.
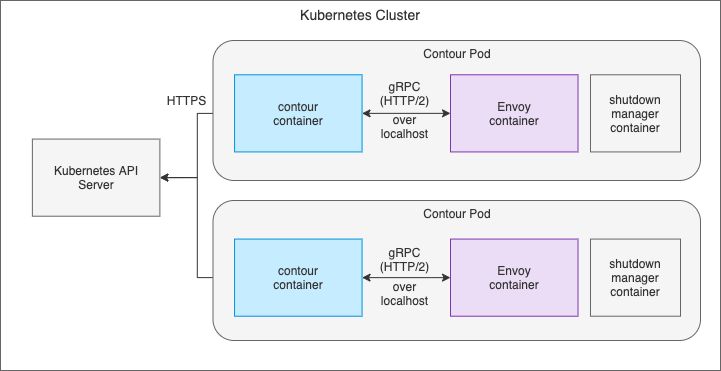
The main drawback of the sidecar deployment is an increase in load imposed on the Kubernetes API server. Instead of running a couple of contour pods to serve the configuration to n Envoy servers, you now have n contour processes connecting to and watching the API server. Unless you plan to run a limited number of Contour pods (by using dedicated ingress nodes, for example), you should avoid this deployment model.
Envoy deployment considerations
Dedicated ingress nodes
The ingress tier is a critical component of an application platform. It is shared across different applications, and it is in the data path between an application and its customers. Due to the importance of the ingress data path, dedicating cluster nodes to run Envoy is beneficial.
The primary benefit is resource isolation. Even though Kubernetes has support for setting up resource requests and limits, getting those parameters right can be challenging. Furthermore, Kubernetes does not support resource isolation for network I/O or file descriptors. When running Envoy by itself, you prevent any potential noisy neighbor problems that could impact the performance of the ingress data plane. You also don’t have to worry about Envoy getting evicted by other pending pods when nodes are under resource contention.
Another reason for running Envoy on dedicated nodes is compliance. Most enterprise environments have predefined firewall rules that can be incompatible with ingress requirements. If you are working in such an environment, dedicated ingress nodes can help, as it is easier to get an exception for a subset of nodes instead of all of them.
Finally, limiting the number of nodes that run Envoy is helpful in bare-metal or on-premises installations. In these deployments, the ingress tier is fronted by a hardware load balancer that, in most cases, is manually configured to route traffic to the ingress nodes. Having a small number of ingress nodes eases the configuration and management of these external load balancers.
Overall, dedicating nodes for ingress purposes can help with performance, compliance, and managing external load balancers. With that said, ingress node failures must be accounted for, as Envoy will not run on nodes other than those reserved for ingress. In the ideal case, failed nodes are automatically replaced with new nodes that can continue handling ingress traffic.
Envoy and host networking
To optimize the ingress traffic path, you can bind Envoy to the underlying host’s network. By doing so, incoming requests bypass the Kubernetes Service fabric (usually iptables rules) and reach Envoy directly.
While running Envoy directly on the host’s network can increase performance, there are important caveats to keep in mind:
-
The Envoy process is no longer isolated in its own network namespace. Therefore, the node’s network interfaces and network services running on the node are accessible to Envoy.
-
The shutdown manager sidecar binds to
0.0.0.0:8090, making it available on all the host’s network interfaces when host networking is enabled. Ensure that there are firewall rules in place that block requests to port 8090. Otherwise, the shutdown manager endpoint can be exploited to bring down the ingress data plane. -
Envoy exposes Prometheus metrics on
0.0.0.0:8002. These metrics will be accessible on the node’s port8002.
If you want to enable host networking in the Envoy pods, you must set the pod’s
hostNetwork field to true and set the dnsPolicy field to
ClusterFirstWithHostNet. The following manifest show the two modifications in
the Envoy pod specification:
---
apiVersion: apps/v1
kind: DaemonSet
metadata:
  labels:
    app: envoy
  name: envoy
  namespace: projectcontour
spec:
  # ...
  # removed for brevity
  # ...
  spec:
    hostNetwork: true # Enable hostNetwork
    dnsPolicy: ClusterFirstWithHostNet # Update dns policy
    containers:
      - args:
          - -c
          - /config/envoy.json
          - --service-cluster $(CONTOUR_NAMESPACE)
          - --service-node $(ENVOY_POD_NAME)
          - --log-level info
        command:
          - envoy
        image: docker.io/envoyproxy/envoy:v1.15.0
        imagePullPolicy: IfNotPresent
        name: envoy
  # ...
  # removed for brevity
  # ...
Avoiding unnecessary network hops
When using a Service to expose Envoy (such as a NodePort or a LoadBalancer
Service), set the externalTrafficPolicy to Local. The Local policy ensures
that incoming traffic is routed to the Envoy instance running on the local node
instead of adding an extra hop to another node.

DaemonSet versus Deployment
In the split deployment model, you can deploy Envoy as a DaemonSet or a Deployment. In most cases, a DaemonSet is preferred because Envoy can efficiently use the underlying node’s CPU cores. Thus, there is no real benefit to running multiple instances of Envoy on the same node.
Using a Deployment for Envoy is suitable when you are leveraging the auto-scaling capabilities of Kubernetes. If you are working in a dynamic environment, such as a cloud provider, you can auto-scale the Envoy deployment according to its utilization using a Horizontal Pod Autoscaler. With that said, you must set pod anti-affinity rules to spread the Envoy pods across different nodes.
If you are deploying Contour under the sidecar model and are not using dedicated ingress nodes, avoid using a DaemonSet. The problem with using a DaemonSet is that a controller runs on every node, which results in unnecessary load on the Kubernetes API server. This overhead on the API server might not be notable in small clusters but can become evident as you grow your clusters.
High Availability
Contour supports running multiple replicas of the control plane component and the data plane component.
On the controller side, contour performs leader election. Once elected, the leader starts serving configuration to the Envoy proxies. The leader election mechanism prevents contour replicas from stepping on each other, mainly when writing status updates back to the API server.
When it comes to the data plane, you can run as many Envoy proxies as needed by the applications running on the platform. The number of Envoy replicas is typically dictated by the size of the nodes where Envoy is running and the amount of traffic you need to handle. At a minimum, you should run two instances to tolerate failure.
Handling DNS records
Applications running in the cluster share the ingress data plane, and thus share a single entry point into the cluster. As with all ingress controllers, one of Contour’s primary responsibilities is to disambiguate ingress traffic according to the configuration defined in the Ingress and HttpProxy resources.
A typical pattern used to expose multiple applications over the same ingress
point is to slice up a domain and assign subdomains to different applications.
When the incoming traffic reaches Envoy, it inspects the Host header of the
request and routes it according to the subdomain. For example, traffic with the
Host header set to appA.cloud.example.com is forwarded to application A, while
a request with the Host header equal to appB.cloud.example.com is forwarded to
application B. To implement this pattern, however, external clients must be able
to resolve the domain names configured in the Ingress and HttpProxy resources.
Wildcard DNS
Using a wildcard DNS is a viable approach to implement subdomain-based routing.
If you are looking to enable this use case, consider using a wildcard DNS record
pointing to the load balancer in front of the Envoy proxies. For example, to
support the scenario mentioned above, you would define a wildcard DNS entry for
*.cloud.example.com.
External-DNS controller
The external-dns controller is another approach for handling DNS records for ingress purposes. The external-dns controller integrates Kubernetes with an upstream DNS provider. The controller continuously creates and updates DNS records according to the configuration defined in Ingress resources.
If you are using a DNS provider that is compatible with external-dns, consider using this controller to enable DNS resolution of services exposed via Ingress. Keep in mind, however, that external-dns is not yet compatible with Contour’s HTTPProxy custom resource. There is an open pull request in the core-dns project that adds support for it.
The external-dns controller uses the Ingress resource’s status field to
determine the DNS record’s target IP address. If you are running Contour without
a LoadBalancer service, you must set the ingress-status-address field in
Contour’s configuration file. Otherwise, Contour does not set the
status.loadBalancer.ingress field of Ingress resources, which prevents the
external-dns controller from working.
Certificate management for TLS
Contour can route traffic to HTTPS and TLS-enabled TCP services. Contour uses the Kubernetes Secret API to access the certificates it needs to serve these applications. There various considerations to make when exposing secure services using Contour, and we discuss them in the following sections.
Wildcard certificates and TLS certificate delegation
Ingress and HTTPProxy resources that route to a TLS-enabled backend must reference a Kubernetes Secret. This Secret contains the private key and serving certificate used to serve traffic over TLS.
Using a wildcard certificate to support a domain and its subdomains is a common practice. In such scenarios, the wildcard certificate is typically owned and managed by the platform operator. Because multiple applications use the wildcard certificate, the cert needs to live in a Secret across various namespaces. This is problematic, as the Secret is readily available to application developers that should otherwise not have read access to this Secret.
Contour addresses this problem with TLS certificate delegation. Instead of creating the wildcard certificate Secret in all namespaces, you store the Secret in a namespace owned by the platform team. Once the Secret is in place, you can allow developers to reference that single Secret from their namespaces.
If you are using wildcard certificates, consider using TLS certificate delegation to protect the certs and minimize management overhead. See the TLS certificate delegation documentation for more details about this feature.
Cert-manager integration
Cert-manager is a Kubernetes controller that automates the issuance and management of certificates. You can use cert-manager to issue certificates for services if you are using the Ingress API. Unfortunately, however, the HTTPProxy API is not yet directly compatible with cert-manager.
If you are planning to use cert-manager with the HTTPProxy API, you must follow a workaround. The workaround involves setting up a dummy Ingress resource that cert-manager uses to issue the certificate. See the Contour and cert-manager guide for additional information on the workaround.
Multi-tenancy considerations
Preventing ingress configuration collisions
Multi-tenant platforms are prone to configuration clashes at the ingress layer.
The primary example is different teams trying to use the same FQDN to expose
their applications. Consider a scenario where an application team exposes their
app at app.example.com. If another team creates an ingress configuration that
uses the same URL, they will create a collision. The same issue can arise with
path-based routing (for example, different teams trying to use /app at
example.com).
Root HTTPProxy resources and Inclusion
Contour addresses this issue with root HTTPProxy resources. Root HTTPProxy
resources define the top-level configuration for a specific ingress point, such
as the FQDN and primary paths. As a platform operator, you configure Contour
only to
accept
root HTTPProxy resources from namespaces under your control. You set this
configuration using the --root-namespaces flag of the contour binary. Then,
when you create the root HTTPProxy resources, you include HTTPProxy resources
from other namespaces.
Inclusion
enables you to control the root HTTPProxy configuration while delegating the
application-specific configuration to the respective application teams (or
namespaces).
The following example shows a sample scenario for a micro-services application.
Assume the --root-namespaces flag is set to httpproxy-roots. The root
HTTPProxy sets the FQDN to example.com. It then assigns the /auth path to
the authentication team, the /reservations path to the reservations team, and
the /profile path to the user profile team. Each team gets to configure
ingress routing in their namespaces, but they can only configure their subpath
of example.com.
# Example HTTPProxy owned by the platform team.
apiVersion: projectcontour.io/v1
kind: HTTPProxy
metadata:
  name: example-com-root
  namespace: httpproxy-roots # Roots can only exist in this namespace
spec:
  virtualhost:
    fqdn: example.com
  includes:
    - name: auth
      namespace: authentication
      conditions:
        - prefix: /auth # The authentication team can use example.com/auth
    - name: reservations
      namespace: reservations
      conditions:
        - prefix: /reservations # The reservations team can use example.com/reservations
    - name: user-profile
      namespace: user-profile
      conditions:
        - prefix: /profile # The user profile team can use example.com/profile
---
# Example HTTPProxy created by the reservations team in their namespace.
apiVersion: projectcontour.io/v1
kind: HTTPProxy
metadata:
  name: reservations
  namespace: reservations
spec: # Notice the `virtualhost` stanza is missing, as this is not a root HTTPProxy
  routes:
    - services: # matches /reservations
        - name: reservations-home
          port: 80
    - conditions:
        - prefix: /cancel # matches /reservations/cancel
      services:
        - name: cancellation-svc
          port: 80
Admission Control
Admission control is another mechanism to prevent ingress configuration collisions and is the most common solution implemented with other ingress controllers. When it comes to ingress, there are different admission strategies you can apply. A straightforward approach is to reject any Ingress resource (or HTTPProxy resource, for that matter) that conflicts with resources that already exist in the cluster. The OPA Gatekeeper project, for example, has an example implementation of this strategy in their library. More advanced admission strategies are also possible. For example, an admission controller can reach out to another system to determine whether an application team can use a given FQDN.
Ingress Isolation
In some scenarios, different tenants or applications need a separate (or
dedicated) ingress path. This could be for performance, regulatory, or other
reasons. In such cases, you can run multiple Contour ingress controllers. Each
controller watches a specific set of Ingress/HTTPProxy resources, as determined
by the ingress class. Use the --ingress-class-name flag on the contour
binary to set the ingress class name.
---
apiVersion: apps/v1
kind: Deployment
metadata:
  labels:
    app: contour
  name: contour
  namespace: projectcontour
spec:
  replicas: 2
  # ...
  # removed for brevity
  # ...
      containers:
      - name: contour
        args:
        - serve
        - --incluster
        - --xds-address=0.0.0.0
        - --xds-port=8001
        - --envoy-service-http-port=80
        - --envoy-service-https-port=443
        - --contour-cafile=/certs/ca.crt
        - --contour-cert-file=/certs/tls.crt
        - --contour-key-file=/certs/tls.key
        - --config-path=/config/contour.yaml
        - --ingress-class-name=my-ingress-class # Set the ingress class here
  # ...
  # removed for brevity
  # ...
To target a specific ingress class in an Ingress or HTTPProxy resource,
developers can set the kubernetes.io/ingress.class annotation:
apiVersion: networking.k8s.io/v1beta1
kind: Ingress
metadata:
  name: my-ingress
  annotations:
    kubernetes.io/ingress.class: "my-ingress-class"
spec:
  rules:
    - host: my-svc.example.com
      http:
        paths:
          - path: /
            backend:
              serviceName: my-svc
              servicePort: 80