Getting Started with VMware GemFire for TAS
This guide walks you through creating a VMware GemFire service instance on the Tanzu Application Service using the Book Service example to confirm that it is working.
Create A VMware GemFire Service Instance
Option 1: Create the service instance using the cf CLI
Starting in a terminal
-
Run
cf login, and create or target your organization’s space. -
Run
cf marketplace -s p-cloudcacheto list your available VMware GemFire plans. Take note of theservice planas this will be your<PLAN-NAME>in the following step. Note that VMware GemFire was previously called Pivotal Cloud Cache). -
Create a VMware GemFire service instance within the space with the following command:
cf create-service p-cloudcache <PLAN-NAME> <SERVICE-INSTANCE-NAME>- Replace
<PLAN-NAME>with one the plan names from step 2. - Replace
<SERVICE-INSTANCE-NAME>with your own custom name for your service instance.
The
<SERVICE-INSTANCE-NAME>can include alpha-numeric characters, hyphens, and underscores. This is also the name you will use in yourmanifest.ymlto bind your client application to the service instance. - Replace
-
If successful you will see
OK
Create in progress. Use 'cf services' or 'cf service <your-service-name>' to check operation status. -
Confirm the VMware GemFire service instance has been created by running
$ cf servicesThis command outputs the current status of the service instance creation. In the last operation column you will either see
create in progressif it is still be created orcreate succeededwhen it is ready to be used.It can take several minutes for the service instance creation to complete.
Option 2: Create the service instance using Tanzu Application Service apps manager
Apps Manger
Apps Manager is a user interface that must be turned on by the operator of the foundation.
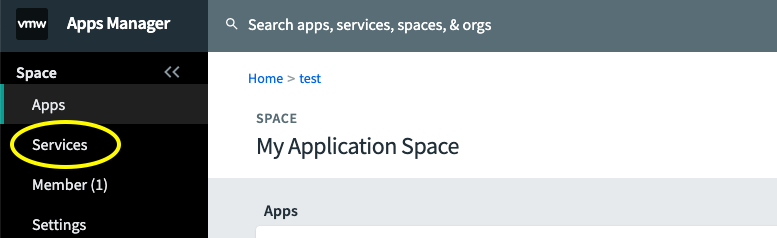
- Within your org, create a space or navigate to the space that will hold your VMware GemFire service instance.
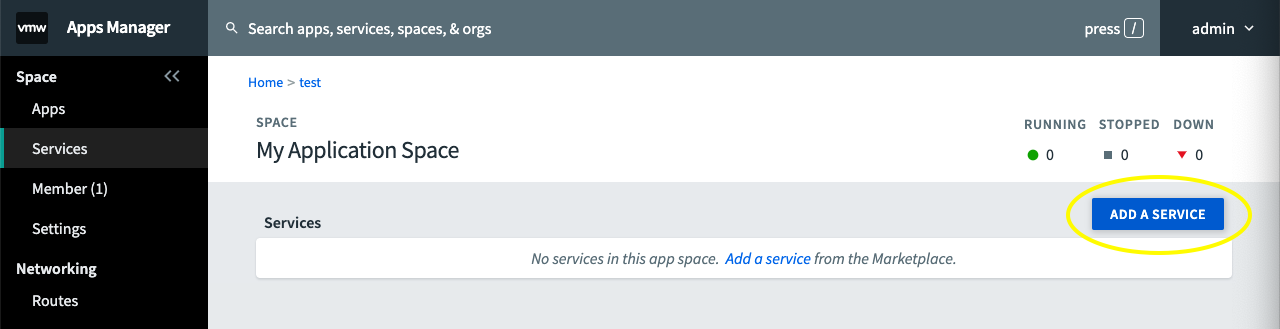
- Click on the Services tab.
- Click on the ADD A SERVICE button.
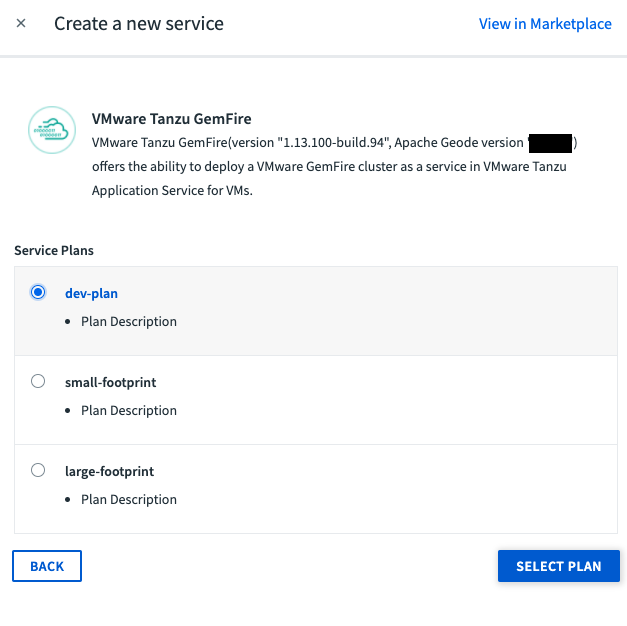
- Click on VMware GemFire.

- Choose one of the available plans and click SELECT PLAN.
-
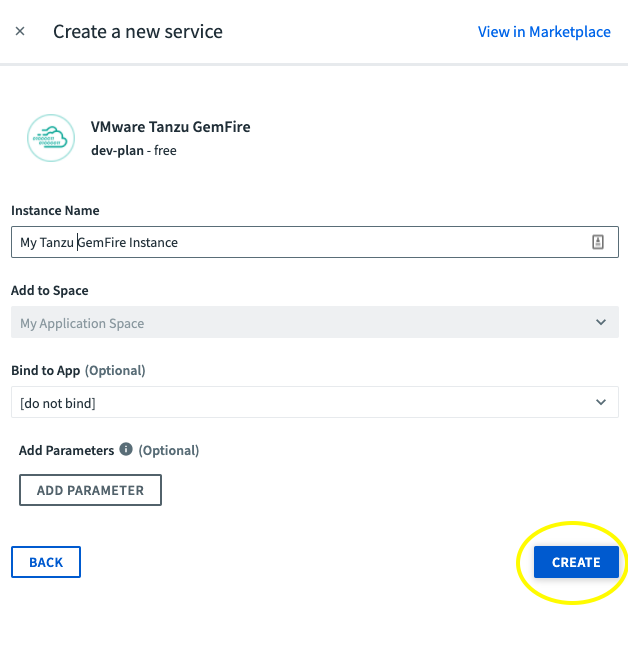
Fill in the Instance Name with a custom name for your service instance. The service instance name can include alpha-numeric characters, hyphens, and underscores. This is the name you will use in your
manifest.yml. (Alternatively, if you have already pushed your application to your space can select it in the “Bind to App” dropdown - however we prefer to bind our applications through amanifest.ymlfile)Click CREATE
-
After clicking create you will see VMware GemFire service instance provisioning begin and in the Last Operation column it will say
create in progress.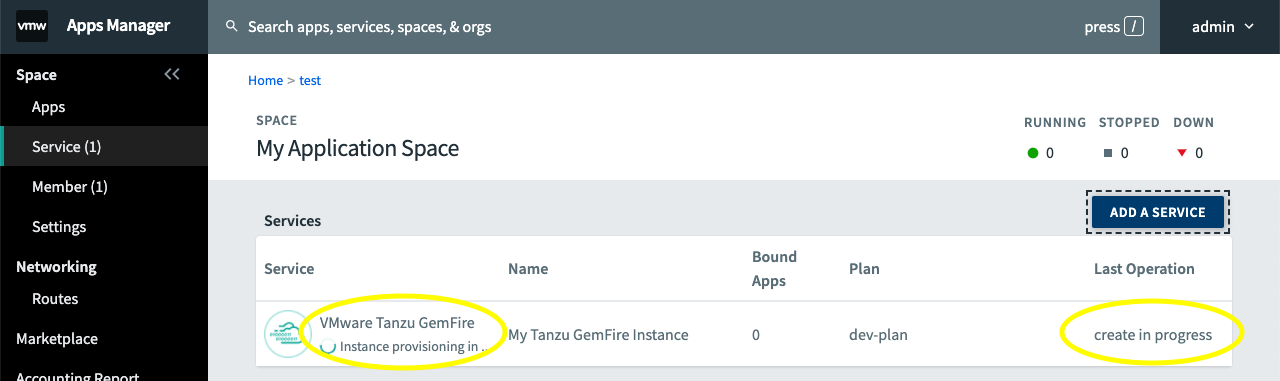
It can take several minutes for the service instance creation to complete.
-
Once complete you will see
create succeededunder the Last Operation column (you may need to refresh the page for the status to update).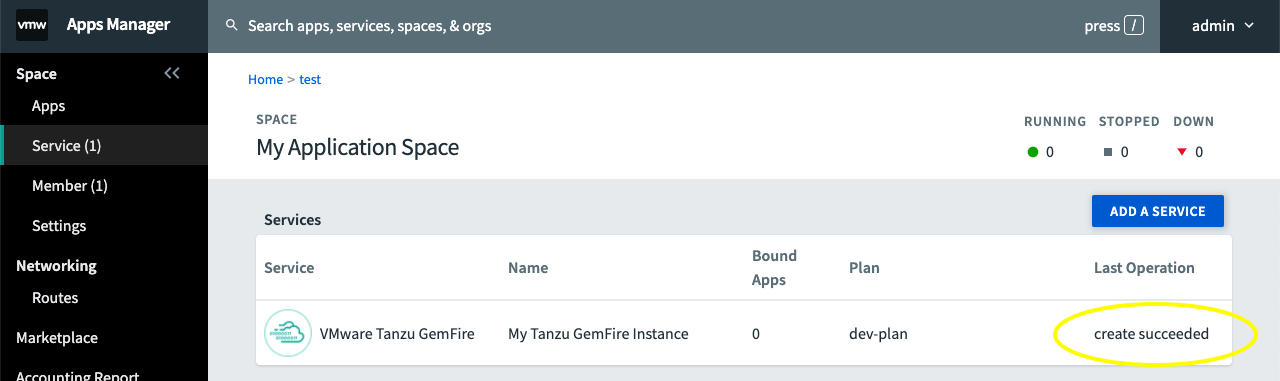
Set Up Your Tanzu Application Service Environment
This section will guide you through testing a Book Service client application on the Tanzu Application Service to confirm that your VMware GemFire service instance and node.js client are set up correctly.
What You’ll Need**
- The Book Service example
- Node.js, version 10.16.3 or above
- The VMware GemFire Node.js client
- A running VMware GemFire service instance on the Tanzu Application Service
1. Clone the Book Service Example
Clone the node examples from the GemFire Node Examples repository.
$ git clone https://github.com/gemfire/node-examples.git
2. Download Node.js for VMware GemFire
To run the Book Service example, you must download and install the VMware GemFire Node.js client library.
- Go to the VMware GemFire product page.
- In the “Releases” drop down, find and select the NodeJS-Client.
- Click on the file icon to download the tar file (.tgz.).
- Once downloaded, copy it to your
Book Serviceproject directory. Do not untar the tar file – the npm command installs the Node.js API directly from the compressed .tgz archive.
3. Install the VMware GemFire Node.js Client
In a terminal, change your working directory to node-examples/book-service, and npm install the VMware GemFire Node.js client you downloaded above, into your project directory.
$ npm install /project/gemfire-nodejs-client-2.0.0.tgz
$ npm update
4. Create a VMware GemFire Service Key
In order to connect to your VMware GemFire service instance and create the needed regions, you must first create a service key.
In a terminal
-
Run
cf login, and create or target your organization’s space where your VMware GemFire service instance is running. -
Create a service key
$ cf create-service-key [YOUR-SERVICE INSTANCE-NAME] [SERVICE-NAME-service-key] -
Output the service key:
$ cf service-key [YOUR-SERVICE INSTANCE-NAME] [SERVICE-NAME-service-key] -
Copy the gfsh connect command labeled as
gfsh_login_string. It will look something like this:connect --url=https://TAS-name.cf-app.com/gemfire/v1 --user=cluster_operator_XXX --password=YYY --skip-ssl-validation
5. Create the Region Used by the Book Service
Start the VMware GemFire CLI by typing gfsh in your terminal.
With gfsh running, Use the connect string from above to connect to the VMware GemFire service instance. Use the return key when prompted for the keystore and truststore values (in this example you don’t need to enter any information in them).
gfsh>connect --url=https://TAS-name.cf-app.com/gemfire/v1 --user=cluster_operator_BhKM --password=xucZ --skip-ssl-validation
 key-store:
 key-store-password:
 key-store-type(default: JKS):
 trust-store:
 trust-store-password:
 trust-store-type(default: JKS):
 ssl-ciphers(default: any):
 ssl-protocols(default: any):
 ssl-enabled-components(default: all):
 Successfully connected to: GemFire Manager HTTP service @ https://TAS-name.cf-app.com/gemfire/v1
Once connected, create the region that the Book Service expects to find.
gfsh>create region --name=test --type=PARTITION
                 Member                      | Status | Message
    ---------------------------------------- | ------ | ------------------------------------------------
    cacheserver-a75d6fcc                     | OK     | Region "/test" created on "cacheserver-a75d6fcc"

    Cluster configuration for group 'cluster' is updated.
Type exit to quit GFSH.
6. Edit the manifest.yaml File
- Navigate to the project root directory.
- Open the
manifest.yml file. - Replace
PCC-TLSwith the name of your VMware GemFire service instance. If you’re not sure of the instance name, run thecf servicescommand.
7. Push your application to TAS
- In a terminal, navigate to the project root directory.
- Push the application to your TAS environment using
cf push
The cf push operation will bind the Book Service app to the VMware GemFire service instance named in your manifest.yaml file and then start the app.
8. Interact with the Book Service
Once the BookService app is running, you can now add and look-up books.
Add a Book
To add a book to the data service, use a curl command similar to the one used when running with a local cluster, specifying the app route assigned in the cf push step.
Mac and Linux
$ curl -X PUT \
  'https://TAS-name.cf-app.com/book/put?isbn=0525565329' \
  -H 'Content-Type: application/json' \
  -d '{
  "FullTitle": "The Shining",
  "ISBN": "0525565329",
  "MSRP": "9.99",
  "Publisher": "Anchor",
  "Authors": "Stephen King"
}'
Windows
$ curl -X PUT "https://cloudcache-node-sample.apps.tas-name.cf-app.com/book/put?isbn=0525565329" -H "Content-Type: application/json" -d "{\"FullTitle\": \"The Shining\", \"ISBN\": \"0525565329\", \"MSRP\": \"9.99\", \"Publisher\": \"Anchor\", \"Authors\": \"Stephen King\"}"
The curl command responds with a confirmation:
`{"initialized":true}`
Look Up a Book
To look up a book in the data service, use a curl command similar to the one used when running with a local cluster, specifying the ISBN as a key:
`$ curl -X GET \'https://cloudcache-node-sample.apps.tas-name.cf-app.com/book/get?isbn=0525565329'`
The curl command responds with the requested data:
{"FullTitle":"The Shining","ISBN":"0525565329","MSRP":"9.99","Publisher":"Anchor","Authors":"Stephen King"}
Delete the app and the Service Instance
There are two ways to delete the app and the VMware GemFire service instance
Option 1: Delete the app and service using the cf cli
-
Stop the running app
cf stop cloudcache-node-sample -
Delete the app and it’s route
cf delete cloudcache-node-sample -r -f -
If the VMware GemFire service instance is no longer needed, delete the service
$ cf delete-service <YOUR SERVICE NAME>
Really delete the service <YOUR SERVICE NAME>?> y
Option 2: Delete the app and service using Apps Manager
- Navigate to the org and space that has your VMware GemFire service instance and click on the App tab.
- Click on the name of the app.
- Click on the Settings tab.
- Click on DELETE APP (at the bottom of the page), and confirm that you want to delete the app.
- Click on the Service tab.
- Click on the name of your service instance.
- Click on the Settings tab.
- Click on the DELETE SERVICE INSTANCE button, and confirm the deletion.
Congratulations! You’re ready to start using VMware GemFire. You will need to create a new VMware GemFire Service Instance when working with your own application.